Simple. Forgiving. The kind of thing that makes people sit down at the table together. This is your first lesson in working with dough.
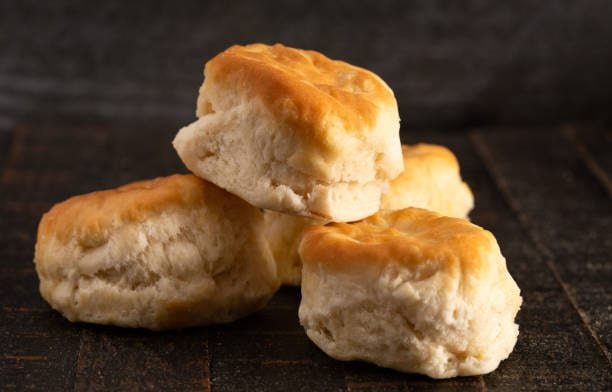
A good buttermilk biscuit is one of the most satisfying things to pull out of an oven. Tall, flaky, golden, with a tender crumb and enough structure to hold butter and honey without collapsing. They go with breakfast, with dinner, with a bowl of soup. They make a Sunday morning feel different from the rest of the week. And unlike most baking, they’re genuinely forgiving — which makes them the right place to start.
Ingredients
Makes 8–10 biscuits.
- 240g (2 cups) all-purpose flour, plus more for dusting
- 1 tbsp baking powder
- ½ tsp baking soda
- 1 tsp salt
- 1 tsp sugar
- 115g (8 tbsp / 1 stick) unsalted butter, very cold — frozen is even better
- 180ml (¾ cup) cold buttermilk, plus a little more if needed
- 2 tbsp melted butter, for brushing
Method
- Preheat and prepare. Heat your oven to 230°C (450°F). Place a rack in the upper third. Line a baking sheet with parchment or lightly grease it. If your butter isn’t frozen yet, put it in the freezer now while you measure the dry ingredients.
- Mix the dry ingredients. In a large bowl, whisk together the flour, baking powder, baking soda, salt, and sugar. Whisk well — you want the leavening evenly distributed so the biscuits rise uniformly. This takes 30 seconds and it matters.
- Work in the butter. This is where biscuits are made or ruined. Grate the frozen butter on the large holes of a box grater directly into the flour mixture, stopping to toss the shreds with the flour every so often to prevent clumping. When all the butter is in, use your fingers to quickly toss everything together until the mixture looks like coarse crumbs with some pea-sized chunks remaining. Work fast — the goal is to keep the butter cold and in distinct pieces, not to blend it in smoothly. Those chunks of butter are what create flaky layers. When they hit the hot oven, they release steam and push the dough apart. Smooth, fully blended butter makes a dense, crumbly biscuit. Distinct pieces make a flaky one. This is the whole game.
- Add the buttermilk. Make a well in the center of the flour mixture. Pour in the cold buttermilk all at once. Use a fork or your hands to mix until just combined — the dough should be shaggy and rough, with some floury patches still visible. Do not overmix. The moment the dough comes together, stop. Overmixing develops gluten and makes tough, bready biscuits. If the dough seems too dry and won’t come together, add buttermilk one tablespoon at a time. It should be sticky but manageable.
- Fold and cut. Turn the dough out onto a lightly floured surface. Pat it into a rough rectangle about 2cm (3/4 inch) thick — don’t use a rolling pin, just your hands. Fold it in thirds like a letter, then pat it out again. Repeat this fold once more. This creates additional layers without overworking the dough. Pat the dough to a final thickness of about 2.5cm (1 inch). Cut straight down with a sharp round cutter or a sharp-edged glass — do not twist the cutter, as twisting seals the edges and prevents rising. Press the scraps together once to cut a few more biscuits. Don’t re-roll the scraps more than once; those biscuits will be tougher.
- Bake. Place the biscuits on the prepared baking sheet with their sides just touching — this helps them rise tall rather than spreading out. Brush the tops with the melted butter. Bake for 12–15 minutes until the tops are deeply golden and the sides have risen and set. Brush with another coat of melted butter the moment they come out of the oven. Eat warm. These are at their best in the first 20 minutes. They reheat reasonably well in a low oven, but nothing beats fresh.
What You’re Learning
Biscuits introduce you to the central tension in all pastry and bread baking: gluten development versus tenderness. Gluten gives bread its chew and structure — it’s what you want in a pizza dough or a baguette. In a biscuit, you want as little of it as possible. That’s why you use cold butter (fat inhibits gluten), handle the dough minimally, and stop mixing the moment things come together. Every step in this recipe is in service of that one goal: keeping the dough tender.
You’re also learning how fat creates texture in baking. Cold, intact butter pieces = flaky layers. Warm, fully incorporated butter = dense crumb. This principle shows up in pie crusts, scones, croissants, and dozens of other recipes. Understand it here and you’ll recognize it everywhere.
Notes
- Cold everything. Cold butter, cold buttermilk, cold hands if possible. Warmth is the enemy of flakiness.
- No buttermilk? Add 1 tbsp of white vinegar or lemon juice to ¾ cup of whole milk. Stir and let it sit for 5 minutes. It won’t be identical but it works.
- Don’t twist the cutter. Press straight down and lift straight up. Twisting seals the cut edges and the biscuit won’t rise properly.
- Sides touching in the pan. Biscuits baked touching each other rise taller. Biscuits with space around them spread out and have crispier sides — also good, just different. Your call.
- The fold is optional but worth it. Even one fold adds visible layers to the finished biscuit. Two folds adds more. Don’t fold more than twice or you’ll start toughening the dough.
- Leftover biscuits make excellent sandwiches the next day — split, toasted in a dry pan, filled with a fried egg and whatever else you have. Start planning for it.