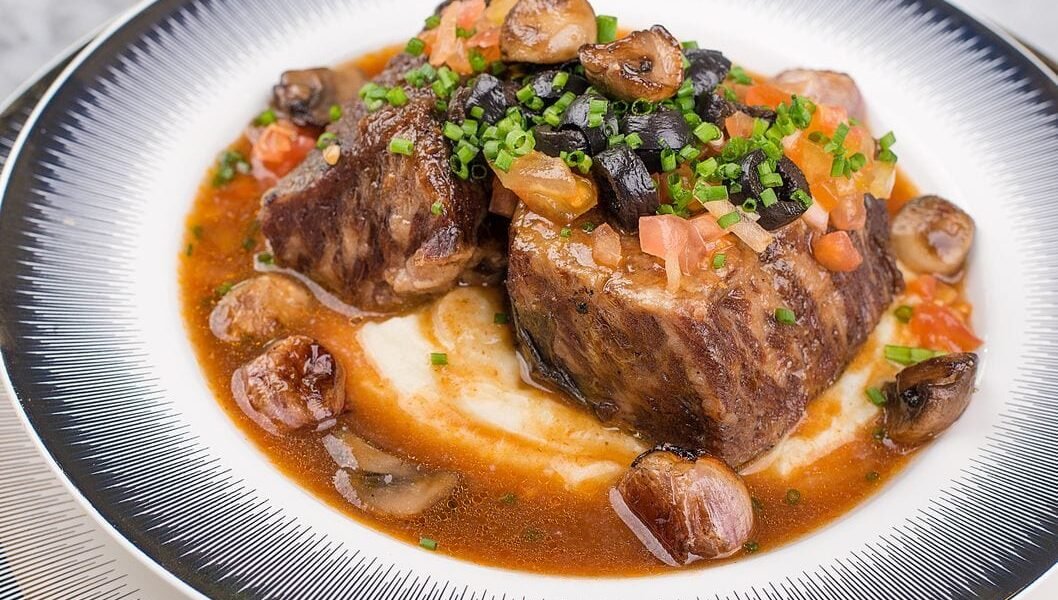
Braised short ribs are the dish that turns a tough, inexpensive cut into something that falls from the bone in silky, wine-dark pieces — and the technique is the same one behind every great braise: sear, add liquid, apply gentle heat, and give it time.
Short ribs are cut from the beef chuck and rib sections — heavily worked muscles with a lot of connective tissue and intramuscular fat. Both are liabilities at high heat and assets at low heat. Over three or more hours in the oven at 325°F (165°C), the collagen in the connective tissue converts to gelatin, which dissolves into the braising liquid and gives it body and richness. The fat renders slowly and bastes the meat from the inside. What starts as a tough, chewy piece of meat ends as something almost molten — yielding, deeply beefy, and coated in a sauce so rich it clings to everything it touches.
The advanced part of this recipe isn’t any single step — it’s the patience to do every step correctly, and the understanding that you can’t rush a braise. The sear needs to be hard and dark before the liquid goes in. The wine needs to reduce before the stock is added. The oven temperature needs to stay low enough that the liquid barely trembles. And the sauce needs to be reduced after the meat is done, which means actively finishing the dish rather than just pulling it from the oven and serving. Do all of that and short ribs will become the dish you make when you want to impress someone without showing it.
What You’re Learning
The braising method. Braising is low, moist heat applied over a long time to tough cuts with connective tissue. It’s the opposite of searing in almost every way: where searing is fast and hot and about surface development, braising is slow and gentle and about internal transformation. The key variables are temperature (never boiling — a full boil toughens the proteins before the collagen has time to convert), liquid level (the meat should be about two-thirds submerged, not fully covered — too much liquid dilutes the sauce), and time (short ribs need at least 3 hours to become tender; 3.5 is better). The pot must be covered and the heat must stay consistent. Check every hour: the liquid should be trembling gently, not bubbling hard. If it’s boiling, drop the oven temperature by 25°F.
Reducing and finishing the sauce. After three-plus hours of braising, the liquid in the pot is richly flavoured but thin — it hasn’t concentrated enough to become a proper sauce yet. This is why the final reduction step matters. Remove the meat, strain the braising liquid, skim the fat from the surface (or refrigerate overnight and lift the solidified fat the next day), then simmer over medium heat until the sauce reduces by roughly half and coats a spoon. The gelatin from the collagen makes it glossy and slightly sticky. A restaurant braise gets a last-minute enrichment of cold butter whisked in off heat — this is called mounting the sauce, and it adds sheen and richness without changing the flavour significantly. It’s the step that makes a home braise look and taste like something from a kitchen that knows what it’s doing.
Ingredients
Makes 4 servings.
- 4 lbs (1.8kg) bone-in beef short ribs (about 4 large pieces)
- 1½ tsp fine salt, plus more as needed
- 1 tsp freshly ground black pepper
- 2 tbsp neutral oil
- 1 large yellow onion, roughly chopped
- 2 carrots, roughly chopped
- 3 celery stalks, roughly chopped
- 6 garlic cloves, smashed
- 2 tbsp tomato paste
- 1 bottle (750ml) dry red wine (Cabernet Sauvignon, Merlot, or Côtes du Rhône)
- 2 cups (480ml) beef stock
- 4 sprigs fresh thyme
- 2 bay leaves
- 2 tbsp cold unsalted butter (for finishing)
Method
- Season and sear the ribs. Remove the short ribs from the refrigerator 30 minutes before cooking. Pat completely dry with paper towels and season all sides generously with salt and pepper. Preheat the oven to 325°F (165°C). Heat the oil in a large Dutch oven or heavy braising pot over high heat until smoking. Working in batches without crowding, sear the short ribs on all exposed sides — at least 3 to 4 minutes per side — until deeply browned. This takes patience: each side needs uninterrupted contact with the hot pan to develop a proper crust. Transfer the seared ribs to a plate. Pour off all but 2 tablespoons of fat from the pot.
- Build the braising base. Reduce heat to medium. Add the onion, carrots, and celery to the pot. Cook, stirring occasionally, for 8 to 10 minutes until softened and beginning to colour. Add the garlic and tomato paste and cook, stirring, for 2 minutes until the tomato paste darkens. Pour in the red wine and bring to a boil. Scrape up all the fond from the bottom of the pot. Boil for 10 to 12 minutes until the wine has reduced by roughly half — the pot should smell concentrated rather than harsh.
- Add stock and braise. Add the beef stock, thyme, and bay leaves. Nestle the seared short ribs back into the pot — the liquid should come about two-thirds up the sides of the meat, not cover them completely. Bring to a simmer, then cover tightly and transfer to the preheated oven. Braise for 3 to 3.5 hours, checking after 2 hours: the liquid should be gently trembling. If it’s boiling, reduce the oven temperature by 25°F. The ribs are done when a paring knife slides into the meat with no resistance and the meat has pulled back from the bone.
- Rest the meat and reduce the sauce. Carefully transfer the ribs to a baking sheet or serving dish and tent loosely with foil. Strain the braising liquid through a fine-mesh sieve into a wide saucepan, pressing on the solids to extract all the liquid. Discard the solids. Skim the fat from the surface of the liquid (or refrigerate overnight — the fat solidifies and is easy to lift off the next day, which produces a much cleaner sauce). Bring the liquid to a boil over medium-high heat and simmer for 15 to 20 minutes until the sauce reduces by roughly half and coats a spoon. Taste and adjust salt. Remove from heat and whisk in the cold butter cubes one at a time until the sauce is glossy.
- Serve. If the ribs have cooled, return them to the sauce and warm gently over medium-low heat for 5 minutes. Serve on mashed potatoes, polenta, or buttered egg noodles. Spoon the sauce generously over the top. Finish with a few thyme leaves or fresh parsley.
Notes
- Make it the day before. Braised short ribs are dramatically better the next day. The flavour deepens overnight, the fat in the sauce solidifies so it can be skimmed cleanly, and reheating gently in the sauce produces ribs that are even more tender than fresh. This is a make-ahead dish by design.
- The sear is not optional. The Maillard reaction on the surface of the ribs produces flavour compounds that the braising liquid cannot replicate. Undercooked, pale-grey ribs going into the braise will produce a dull, flat result. Take the time to get each side genuinely dark before moving to the next step.
- Use drinkable wine. You’re reducing most of a bottle into the sauce, so bad wine makes bad sauce. It doesn’t need to be expensive, but it should be something you’d pour a glass of. Avoid “cooking wine” with added salt.
- The sauce will look thin when hot. The gelatin from the collagen sets as the sauce cools, so what looks thin at 200°F will have significantly more body at serving temperature. Don’t over-reduce.
- Boneless short ribs work too. Boneless English-cut short ribs can be substituted. Reduce the cooking time by about 30 minutes and check for tenderness starting at 2.5 hours. The sauce won’t be as gelatinous without the bones.
- Serving suggestions. Creamy mashed potatoes are the classic base — they absorb the sauce well. Polenta or soft grits work equally well. Buttered egg noodles or a piece of crusty bread to soak up the sauce are also good options.